Thursday, November 13, 2008

Developing mobile applications using Gear episode 3: Managing user inputs

This tutorial will discuss how to handle user inputs in gear based applications and will guide you through the development of a simple picture viewing application.

User input is generally handled by classes inheriting from GWCanvas (thus also GWForm, GWList, GWGrid, etc…). In J2ME applications there are 3 types of inputs available: commands (triggered by soft keys), keypad and touch screen.
In Gear based applications touch screen events can be handled in two different ways: as pointer events and as gesture based events.

Command and gesture triggered events don't need to be handled necessarily in the widgets classes since they use a listener based paradigm, but it is common practice to do so.

To start developing the picture viewer demo we'll have first to create a Gear based J2ME application as explained in the first tutorial "Developing mobile applications using Gear episode 1: Create the first empty application".

The picture viewer demo will permit the user to browse through a set of images included as resources in the JAR archive and to see them in full-screen mode.

Note that the content of this tutorial applies to version 1.1.1 of Gear framework

Step 1: Creating the photo browser widget

First let's create the PhotoBrowser class, make it inherit from GWScrollableList and set it's title and its title icon.

public class PhotoBrowser extends GWScrollableList {
public PhotoBrowser() {
setTitle("Photo browser");
setTitleIcon("/Digitalapes.png");
}
}

Then let's add two commands to the interface (View and Exit).
To do so we have to make PhotoBrowser implement GWCommandListener interface, we have to register it self as a command listener and finally add two commands.

public class PhotoBrowser extends GWScrollableList
implements GWCommandListener {

Command viewCommand = new Command("View",Command.ITEM,0);

public PhotoBrowser() {
setTitle("Photo browser");
setTitleIcon("/Digitalapes.png");
setCommandListener(this);
addCommand(viewCommand);
addCommand(CommonCommands.EXIT);
}

public void commandAction(Command command, GWCanvas sender) {
}
}

Now we need to make the photo browser show the images thumbnail.
This step requires to load the pictures in the photo browser constructor, note that we'll suppose to have a list of the available pictures contained in the PhotoList class (the class code, along with the pictures is included in the demo source code).

public PhotoBrowser() {
setTitle("Photo browser");
setTitleIcon("/Digitalapes.png");
setCommandListener(this);
setStretchIcons(true);
for (int i=0;i < PhotoList.list.length;i++){
ListItem tmp =
new ListItem(PhotoList.list[i],"/"+PhotoList.list[i]);
tmp.setMinVisibleLines(3);
addItem(tmp);
}
addCommand(viewCommand);
addCommand(CommonCommands.EXIT);
}

Now photo browser displays all the thumbnails but no actions are associated to the user inputs.
Let's associate a quit action to the Exit command pressure and a let's make the PhotoView class (that we are going to implement in the next step) displayed when the View command or the fire button are pressed.
At the end your class should look like this one:

public class PhotoBrowser extends GWScrollableList implements
GWCommandListener {

Command viewCommand = new Command("View",Command.ITEM,0);

public PhotoBrowser() {
setTitle("Photo browser");
setTitleIcon("/Digitalapes.png");
setCommandListener(this);
setStretchIcons(true);
for (int i=0;i < PhotoList.list.length;i++){
ListItem tmp =
new ListItem(PhotoList.list[i],"/"+PhotoList.list[i]);

tmp.setMinVisibleLines(3);
addItem(tmp);
}
addCommand(viewCommand);
addCommand(CommonCommands.EXIT);
}

public void itemClicked(ImageItem clickedItem) {
commandAction(viewCommand, this);
}

public void itemSelected(ImageItem selectedItem) {
super.itemSelected(selectedItem);
PhotoList.setCurrentPhoto(getSelectedIndex());
}

public void commandAction(Command command, GWCanvas sender) {
if (command == viewCommand)
EventManager.getInstance().enqueueEvent(
new DisplayWidget(this,SlideShow.class));
else if (command == CommonCommands.EXIT)
EventManager.getInstance().enqueueEvent(new QuitEvent(this));
}

protected boolean showCheck(Display display, EventArg eventArgs) {
setSelectedIndex(PhotoList.getCurrentPhotoIndex());
return true;
}
}

Step 2: Creating the photo viewer widget

As before the first step is creating the class (this time inheriting from GWCanvas), setting title and icon, and managing commands

public class SlideShow extends GWCanvas implements GWCommandListener{

Command browseCommand = new Command("Browse",Command.OK,0);

public SlideShow() {
setTitle("Photo viewer");
setTitleIcon("/Digitalapes.png");
setCommandListener(this);
addCommand(browseCommand);
addCommand(CommonCommands.EXIT);
}

protected void contentPaint(Graphics g, int x, int y, int w, int h) {
}

public void commandAction(Command command, GWCanvas sender) {
if (command == browseCommand)
EventManager.getInstance().enqueueEvent(new
DisplayWidget(this,PhotoBrowser.class));
else if (command == CommonCommands.EXIT)
EventManager.getInstance().enqueueEvent(new QuitEvent(this));
}
}

Now let's handle the current picture paintig: to paint something in the GWCanvasthe paint operations should be performed in the contentPaint() method, using the parameter as paintable area bounds.
In order to make this widget display the picture requested by the PhotoBrowser, we should also put the proper loading code in the showCheck() method.

String currentImage=null;

protected void contentPaint(Graphics g, int x, int y, int w, int h) {
g.drawImage(ImageResourcesBuffer.getImageResource(
currentImage, w-this.formPadding*2, h-this.formPadding*2),
x+w/2, y+h/2, Graphics.VCENTER|Graphics.HCENTER);
}

protected boolean showCheck(Display display, EventArg eventArgs) {
String photoName = PhotoList.getCurrentPhoto();
currentImage = "/"+photoName;
setTitle("Photo view - "+photoName.substring(0, photoName.length()-4));
return true;
}

Now let's associate to the left and right key pressed events a slide action, making the visualize respectively the next and the previous picture

protected void rightArrowPressed() {
PhotoList.getNextPhoto();
EventManager.getInstance().enqueueEvent(new
DisplayWidget(this,SlideShow.class,SlideRight.class));
}

protected void leftArrowPressed() {
PhotoList.getPrevPhoto();
EventManager.getInstance().enqueueEvent(new
DisplayWidget(this,SlideShow.class,SlideLeft.class));
}

The last step for this widget is the handling of touch screen gestures. To handle touch screen gestures we have to make our class implement the GWGestureListener interface, register it as a gesture listener and then implement the required callbacks.
Finally your class should look like this one:

public class SlideShow extends GWCanvas
implements GWCommandListener, GWGestureListener{
Command browseCommand = new Command("Browse",Command.OK,0);
String currentImage=null;

public SlideShow() {
setTitle("Photo viewer");
setTitleIcon("/Digitalapes.png");
setCommandListener(this);
setGestureListener(this);
addCommand(browseCommand);
addCommand(CommonCommands.EXIT);
}

protected void contentPaint(Graphics g, int x, int y, int w, int h) {
g.drawImage(ImageResourcesBuffer.getImageResource(
currentImage, w-this.formPadding*2, h-this.formPadding*2),
x+w/2, y+h/2, Graphics.VCENTER|Graphics.HCENTER);
}

public void reset() {
}

public void commandAction(Command command, GWCanvas sender) {
if (command == browseCommand)
EventManager.getInstance().enqueueEvent(
new DisplayWidget(this,PhotoBrowser.class));
else if (command == CommonCommands.EXIT)
EventManager.getInstance().enqueueEvent(new QuitEvent(this));
}

public void downToUpScrollGesture() {
}

public void upToDownScrollGesture() {
}

public void rightToLeftScrollGesture() {
PhotoList.getNextPhoto();
EventManager.getInstance().enqueueEvent(
new DisplayWidget(this,SlideShow.class,SlideRight.class));
}

public void leftToRightScrollGesture() {
PhotoList.getPrevPhoto();
EventManager.getInstance().enqueueEvent(
new DisplayWidget(this,SlideShow.class,SlideLeft.class));
}

protected void rightArrowPressed() {
PhotoList.getNextPhoto();
EventManager.getInstance().enqueueEvent(new
DisplayWidget(this,SlideShow.class,SlideRight.class));
}

protected void leftArrowPressed() {
PhotoList.getPrevPhoto();
EventManager.getInstance().enqueueEvent(new
DisplayWidget(this,SlideShow.class,SlideLeft.class));
}

protected boolean showCheck(Display display, EventArg eventArgs) {
String photoName = PhotoList.getCurrentPhoto();
currentImage = "/"+photoName;
setTitle("Photo view - "+photoName.substring(0, photoName.length()-4));
return true;
}

}

Step 3: Adding the glue

First we need to implement the class containing the pictures index:

public class PhotoList {

private static int selectedPhotoIndex=0;
private PhotoList() {
}
public static final String[] list = {
"Church.jpg",
"Dema.jpg",
"Marco.jpg",
"Paolo.jpg",
"PizBoe.jpg",
"SellaRonda.jpg",
"Track22.jpg",
"Zoncolan.jpg"
};
public static String getNextPhoto(){
selectedPhotoIndex++;
if (selectedPhotoIndex>=list.length)
selectedPhotoIndex=0;
return getCurrentPhoto();
}
public static String getPrevPhoto(){
selectedPhotoIndex--;
if (selectedPhotoIndex<0)
selectedPhotoIndex=list.length-1;
return getCurrentPhoto();
}
public static void setCurrentPhoto(int i){
if (i>=0 && i<list.length)
selectedPhotoIndex = i;
}
public static String getCurrentPhoto(){
return list[selectedPhotoIndex];
}
public static int getCurrentPhotoIndex(){
return selectedPhotoIndex;
}
}

And finally we have to enable graphic effects in the Gear midlet (to see the transitions) and display the PhotoBrowser at midlet initialization.

setGraphicEffectsEnabled(true);
EventManager.getInstance().enqueueEvent(new DisplayWidget(this,PhotoBrowser.class));

Conclusions

The application we have just created shows how to handle different types of user inputs and gives some basic knowledge about creation of custom graphic widgets and about usage of advanced graphic effects.
It is possible to download the source code and the binary package of this application from Gear's download page.

Friday, September 5, 2008

Developing mobile applications using Gear episode 2: Start using gear widgets and events

The previous episode of this tutorial covered all the necessary steps to setup a development environment for J2ME applications using Eclipse, EclipseME end Gear.
The previous instructions (available here) are still valid except for the Gear framework version since a new release is now available for download (Gear 1.0.0) .
This tutorial will cover the basic steps required to develop a simple application displaying two forms using Gear widgets system end its event based paradigm.
At the end of this tutorial you will have produced an application like the one you can see in the following screen shots:


Step 1: Create the first GearMidlet
In the step 3 of the previous tutorial we have created an empty J2ME application (midlet suite) and we have added Gear to it.
The midlet suite itselft is not a real application, it's a container for one or more midlet and each midlet is potentially a completely independent application, however most of the midlet suites available contain just one midlet thus a midlet suite is commonly considered equivalent to a mobile application.
Anyay, to start developing our application, we need to create a midlet that will be considered the execution entry point of our midlet suite.
  • Enter the "New->Other" menu and select "J2ME Midlet"
  • Enter the midlet name, the package and change the superclass to "gear.application.GearMidlet"
  • Now you have the midlet created it still does nothing but you can try executing it by right clicking on it and selecting "Run As->Emulated J2ME Midlet" as shown in the following screen shot.


NOTE: In order to continue developing the application of this tutorial it is necessary to add this icon to the "res" folder of your project.

Step 2: Create two forms using GWGrid and GWList
To crate a form using Gear Widgets system simply create a class and inherit one of the available form types.
In Gear version 1.0.0 there are four forms already implemented (GWText, GWGrid, GWList and GWScrollableList) each of these forms can be extended to add any functionality and new forms can be created by extending GWCanvas and GWForm classes.
In this article we'll learn how to display two forms containing 4 items using GWGrid and GWList classes.
  • First we have to create two classes and make one inherit from GWGrid and the other one from GWList, the two classes should look similar to these two:
    public class TestGWGrid extends GWGrid{
    public TestGWGrid() {
    super();
    }
    }
    public class TestGWList extends GWList{
    public TestGWList() {
    super();
    }
    }
  • Now we have to fill both classes with the items to be displayed and we have to set the title and the title icon, to do so we have to put the following code in the TestGWGrid constructor:
    // Constructs the grid with 2 rows and 2 columns
    super(2,2);

    // Set the Grid to stretch properly the icons
    setStretchIcons(true);

    // Add four items to the Grid
    addItem("Item 0", "/digitalapes.png");
    addItem("Item 1", "/digitalapes.png");
    addItem("Item 2", "/digitalapes.png");
    addItem("Item 3", "/digitalapes.png");

    // Set the grid title
    setTitle("TestGWGrid");

    // Set the grid title icon
    setTitleIcon("/digitalapes.png");

    and the following code in TestGWList constructor:

    super();

    // Set the List to stretch properly the icons
    setStretchIcons(true);

    // Add four items to the list
    addItem("Item 0", "/digitalapes.png");
    addItem("Item 1", "/digitalapes.png");
    addItem("Item 2", "/digitalapes.png");
    addItem("Item 3", "/digitalapes.png");

    // Set the list title
    setTitle("TestGWGrid");

    // Set the list title icon
    setTitleIcon("/digitalapes.png");
    Setting title and title icon is not compulsory, if none is set the top bar is not displayed

  • Finally to interact with the user we'll add two commands to the forms and we'll intercept these commands.
    To do this we have to add the following code at the end of both constructors:
    // Add two commands
    addCommand(CommonCommands.NEXT);
    addCommand(CommonCommands.EXIT);

    // Add this class as a command listener
    addCommandListener(this);
    And both classes have to implement the "GWCommandListener" interface this way:
    public void commandAction(Command command, GWCanvas sender) {
    if (command == CommonCommands.NEXT){
    // Do something
    } else if (command == CommonCommands.EXIT){
    // Do something else
    }
    }
Step 3: Connecting everything using events
The Gear architecture is based on a multi threading paradigm, so, to permit easy thread to thread communication, Gear provides an event based communication system.
Each event is an object of a class inheriting from the "Event" class, an event may be dispatched by any object and caught by any other.
Dispatching an event requires simply to call the method "enqueueEvent" of the "EventManager" singleton.
Catching an event is a bit more complicated: the class which wants to catch the event should implement the "EventHost" interface and should register to the "EventManager" using the "registerHost" method.
By default the GearMidlet catches the "Quit" and the "DisplayWidget" events. When receiving the first one the midlet will call the "onDestroy" callback and will quit the application if the return value is true. When receiving the "DisplayWidget" event the midlet will handle the eventual widget instantiation and will make the widget visible on screen and active.
  • To start a widget on midlet start we'll have to dispatch a "DisplayWidget" event in the midlet constructor.
    public TestGearMidlet() {
    // This event requires the midlet to handle
    // instantiation of a TestGWGrid and display it
    EventManager.GetInstance().enqueueEvent(
    new DisplayWidget(this,TestGWGrid.class));
    }
  • To permit the user to exit and switch between the two forms we'll have to add the proper event dispatching functions in the command handling callbacks.
    In TestGWList command callback we'll have to put the following code:
    public void commandAction(Command command, GWCanvas sender) {
    if (command == CommonCommands.NEXT){
    EventManager.GetInstance().enqueueEvent(
    new DisplayWidget(this,TestGWList.class));
    } else if (command == CommonCommands.EXIT){
    EventManager.GetInstance().enqueueEvent(
    new Quit(this));
    }
    }
    And in TestGWGrid command callback we'll have to put this code:
    public void commandAction(Command command, GWCanvas sender) {
    if (command == CommonCommands.NEXT){
    EventManager.GetInstance().enqueueEvent(
    new DisplayWidget(this,TestGWList.class));
    } else if (command == CommonCommands.EXIT){
    EventManager.GetInstance().enqueueEvent(
    new Quit(this));
    }
    }
    This way, when the user will press the "Exit" command a "Quit" event will be dispatched and midlet will close.
    And, when the user will press the "Next" command a "DisplayWidget" event will be dispatched and the midlet will change the currently displayed forom.
Conclusions
The application we have just created shows the structure of a typical Gear based application and gives some examples of basic widgets handling.
It is possible to download the source code and the binary package of this application from this page.
In the next tutorial more advanced features of the Gear widgets system will be explained (like transitions, list and grid items customization, arrows and fire keys handling, themes, etc...), then the tutorials will focus more on the event communication system, the location abstraction layer and the other Gear functionalities.

Thursday, July 24, 2008

Developing mobile applications using Gear episode 1: Create the first empty application

This is the first episode of a series of tutorials about developing mobile applications in J2ME using Gear framework. This tutorial will cover the first steps required to start developing any J2ME applications with or without using the Gear framework, the next tutorials will be more focused on Gear based applications. Every step of the tutorial has been tested on Windows Vista/XP and Ubuntu Linux, if you want to develop using MacOS, due to the lack of official Sun emulator, you should try MPowerPlayer or MicroEmulator tutorials.

Step 1: Obtain the required software
There are two IDEs suitable for J2ME development: Eclipse and NetBeans, this tutorial will cover the steps required to develop using Eclipse. The required software thus will be:
Download Eclipse IDE and Sun WTK from the links above and install both on your system. Installing Eclipse requires simply to extract the compressed package downloaded from the Eclipse site in a folder, typically "c:\Programs" on Windows or "/opt" on Linux. The Wireless Toolkit has a self installing procedure that will ask the user the target installation directory, again the typical directories are "c:\Programs" and "/opt".
If you plan to use Gear framework download the Gear jar and javadoc and put them in a directory of your choice (/opt in this tutorial).
We'll assume that after this step you'll have an Eclipse and a WTK directory in either one of the two directories listed above and eventually Gear files in the directory "/opt".


Step 2: Configure Eclipse and EclipseME
Now that you have installed the basic software it is time to execute Eclipse and configure it to support J2ME development.

  • First run Eclips and go to the plug in install section.
  • Select "Search for new features to install", click "Next" and add a new remote site.
  • Select finish and install the plugin.
  • Go to the preferences dialog and enter the "J2ME" section.
  • Enter the "Device Management" subsection, press the "Import" button, select the directory where you have installed the WTK before and press "Finish" button.
  • Now go to the "Java->Debug" section of the preferences and change the "Debugger timeout" value to 30000.
Now Eclipse is configured correctly to write, run and debug J2ME applications.

Step 3: Create an application and reference the Gear framework
Now it is time to create an empty J2ME application.
  • Enter the Eclipse "New" menu and select "Other".
  • Now create a new J2ME midlet suite, enter the name
    and press Next until you find the "Java settings" screen.
The following steps are optional, if you don't want to use the Gear framework just press "Finish".
  • Select the "Libraries" tab, press the "Add External JARs..." button and select the Gear jar file from the directory where you saved it.
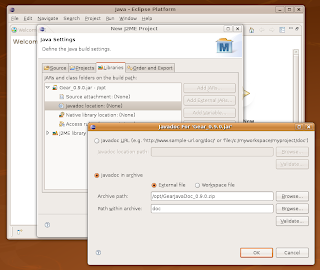
  • Add JavaDoc to Gear: click "javadoc location" sub menu and press the "Edit" button.
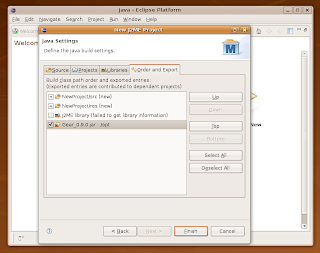
  • Select Gear to be deployed within your application: enter the "Order and Export" tab, and click on Gear check box.
Now simply press the "Finish" button and you'll be ready to start programming your J2ME application.

Conclusions
The midlet suite we have created, is now ready to be filled with a set of midlets and all your application classes. In the next tutorials we'll describe how to create the midlets, how to display an interface, how to andle user's input and much more.