Step 1: Obtain the required software
There are two IDEs suitable for J2ME development: Eclipse and NetBeans, this tutorial will cover the steps required to develop using Eclipse. The required software thus will be:
- Eclipse IDE
(Eclipse 3.3 Europa) - Sun Wireless Toolkit
(WTK 2.5.2) - EclipseME
(EclipseME 1.7.9, update site: http://www.eclipseme.org/updates/) - Gear framework
(Gear JMF 0.9.0)
If you plan to use Gear framework download the Gear jar and javadoc and put them in a directory of your choice (/opt in this tutorial).
We'll assume that after this step you'll have an Eclipse and a WTK directory in either one of the two directories listed above and eventually Gear files in the directory "/opt".
Step 2: Configure Eclipse and EclipseME
Now that you have installed the basic software it is time to execute Eclipse and configure it to support J2ME development.
- First run Eclips and go to the plug in install section.

- Select "Search for new features to install", click "Next" and add a new remote site.

- Select finish and install the plugin.

- Go to the preferences dialog and enter the "J2ME" section.

- Enter the "Device Management" subsection, press the "Import" button, select the directory where you have installed the WTK before and press "Finish" button.

- Now go to the "Java->Debug" section of the preferences and change the "Debugger timeout" value to 30000.


Step 3: Create an application and reference the Gear framework
Now it is time to create an empty J2ME application.
- Enter the Eclipse "New" menu and select "Other".

- Now create a new J2ME midlet suite, enter the name
and press Next until you find the "Java settings" screen.


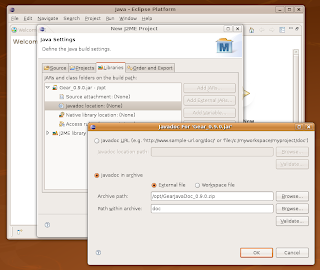
- Select the "Libraries" tab, press the "Add External JARs..." button and select the Gear jar file from the directory where you saved it.

- Add JavaDoc to Gear: click "javadoc location" sub menu and press the "Edit" button.
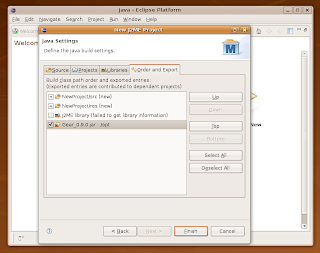
- Select Gear to be deployed within your application: enter the "Order and Export" tab, and click on Gear check box.


Conclusions
The midlet suite we have created, is now ready to be filled with a set of midlets and all your application classes. In the next tutorials we'll describe how to create the midlets, how to display an interface, how to andle user's input and much more.

